Listen to the full episode to learn about whiteboards in the math classroom.
The Full Transcript for Episode 31
As we enter the end of the school year, are you noticing that your students are less engaged than usual? Or maybe you’ve noticed that this year has been unlike any other students are apathetic towards learning. They don’t want to do anything, and there’s an overall unwillingness to try. In today’s episode, I’m going to give you a strategy that I use in my classroom to combat this thing. So let’s get started.
Welcome to solving for the undefined podcast. I’m your host, Johanna, founder of Miss Kuiper’s Classroom, the place that equips teachers and creating a healthy math classroom where students can thrive, no matter their academic abilities. But it’s not always about the numbers. And that’s why I’m here, bringing you the formulas to solve your problems, math and otherwise, plus strategies on cultivating that necessary math mindset. And that’s what you can count on.
All right. Hello, hello, and welcome to episode 31. In today’s episode, we are going to be talking about what the reason is behind kids not trying and one strategy that you can use to help combat this. So why don’t kids try? What is the reason one of the things that I have noticed about this generation of students is the fear of failure. They don’t want to be wrong. So what better way to not be wrong than to not try and with that fear of failure or fear of getting it wrong, the embarrassment of if they’re wrong. And this is especially true if students are answering in front of a class or working with a partner, to a lot of students saying, I don’t know, is less embarrassing than giving a wrong answer.
And this idea that students have that failing is bad or embarrassing, is something that can be tough to overcome. I know with my students, it tends to be that way. And I always bring back the quote of Thomas Edison and the light bulb, he figured out through trial and error 99 ways the light bulb can’t work or 99 ways to not make a light bulb. But it took all of those tries of not getting it to work to find the correct way to make a light bulb. And his failure led into one of the most amazing successes that we see in the modern age.
So one of the things I do in my classroom to help students transition from the “I don’t know”, or “I don’t want to” is to use whiteboards. Now, I know that may seem like “What??” kind of upfront but really, this has been the most life changing thing I’ve done in my classroom. Now, when I first started using mini whiteboards in my classroom, it was a once in a while thing when I had a set of problems I wanted students to do as a class. And I would just have them do it on whiteboards. I put the problem on the document camera, and they’d write their answers on the whiteboard. And I’d go show me your math, kind of like “Tony the Tiger”-esque style. And then students would hold up their whiteboard with their answer. And this worked really well because I got almost 100% engagement every single time. But since then, I’ve learned a lot more about how to make whiteboards useful inside of a classroom, to not just students are engaging and doing the work, but actually helping them become collaborators, independent thinkers, and overall better mathematicians.
A little while ago, I posed a question on my Instagram Stories asking teachers how often they use whiteboards with their students. And the options for this poll were everyday quite often once in a while, and rarely, and surprisingly, the results are as followed. 35% of people said every day 24% said quite often 20% said once in a while, and 21% said rarely. And I did get one response from a math teacher who teaches, I think they said calculus, and as you get into higher grades, it can tend to be more challenging to find ways for students to use whiteboards. So as we dive into talking about whiteboards, there are three different styles of whiteboards. I don’t know if you can hear my dog snoring in the background. Enjoy the wonderful sound if you can.Three different styles of whiteboards that I use. So I use mini whiteboards, dry erase leaves, and then vertical non permanent surfaces as they’re called by vertical whiteboards or surfaces in my classroom.
And for this, I dug up some research by Peter Liljedahl. He wrote building thinking classrooms and did a bunch of research inside of classrooms with this. And I’m going to kind of share a summary of what it is. I’ll also post a picture of this in the show notes on my website. The research is conducted with 46 different groups. 10 are on vertical whiteboards. 10 are on horizontal whiteboards, or mini whiteboards. Nine are on vertical paper, nine are on horizontal paper, and eight groups are using notebooks. And one thing that I saw right off the bat is the time it took students to start the task was almost equal, it was about 12 to 14 seconds overall. But the time that it took for students to start writing, work, or writing an answer is drastically different. On vertical whiteboards and horizontal whiteboards, it took students roughly 20 seconds to start writing stuff down. However, on vertical and horizontal paper, it took students two minutes to start writing anything. And what’s shocking is it only took students about 18 seconds to start writing in notebooks. But here’s where notebooks and whiteboards kind of veer off from each other. In looking at the eagerness, student discussion, participation, persistence, and mobility, this is where whiteboards just skyrocket in comparison to notebooks. Now taking a deeper look into vertical whiteboards versus horizontal whiteboards. The main difference I see is to areas eagerness and mobility. Students who are working on vertical whiteboards had a slight higher eagerness level than students who are working on horizontal whiteboards. And then for mobility, vertical whiteboards definitely had a much higher mobility rate because students are standing there moving around a lot more than students who are working on horizontal whiteboards. The reason I bring this study or research up is just to give you some background knowledge of why I’m even sharing about whiteboards. Because I could give you a lot of anecdotal evidence or noticings. I’ve seen with my own students when it comes to whiteboards. But sometimes I feel like some data driven research can be a lot more impactful.
Are you so ready to be done with this school year that you want someone to plan your last couple of weeks of school? If this is you, I’ve got you covered with the end of the year survival pack. Inside of this survival pack you will receive 10 different activities! My favorite being the Summer Vacation Budget Project. In this project, students are actually budgeting out a one week vacation to anywhere they want. Looking up the real life prices of things. I do this every year and it’s a blast.
Also included in this end of the year bundle
- (3) Guess that Slogan activities where students match a brand to a slogan
- (3) Academic Vocab Word Searches
- A game of spoons using proportional relationship
- A game of spoons using systems of equations
- Ultimate Tic Tac Toe using solving equations
And here’s a bonus for you. If you use the code “SURVIVOR” at checkout, you’ll receive 20% off your purchase. So now you can make the end of the year about thriving, not surviving.
So now that we know the three different types of whiteboards you can use as well as the research behind them. How can you use the different types of whiteboards? So up first, let’s talk about mini whiteboards or the horizontal whiteboards. So one thing that I use these for is warmups, I’ve transitioned from using my notebooks for warmups to using whiteboards. I find the engagement of students willing to try is astronomically different. Plus, I’ve also transitioned to making my warm ups very open ended or open, middle.
And PROTIP: Whenever you use whiteboards, I always give my students doodle time. And I pair this with them getting the whiteboards and markers and bringing them back to their seats that way and kind of incentivizes them to move a little bit quicker. Because the less time they spend getting the materials, the more time they will have to doodle. And this just gets the overall wanting to draw out of the way so then they can focus on making sure they’re doing the math task at hand.
In addition to doing warm ups on mini whiteboards, I do my lesson intros. So if I’m having students kind of discover the next thing like I did a recent one with volume, I had a video of two different cylinders being filled with popcorn. It was a “What do you notice? What do you wonder”, “What’s a good estimate of how much popcorn is in each cylinder?” So those types of things I have students do on mini whiteboards.
And with this, if I’m having students doing a group task, (I have my students sit in groups of three, by the way). So if I’m having students do a group tasks that requires them to stay at their desks, I have them use the mini whiteboards, I rarely use paper worksheets anymore in my class. But that brings me to our second mode of whiteboards, which is dry erase sleeves.
If you’re unsure of what a dry erase leave, think of a sheet protector, but more sturdy material. So that way, you can put a paper inside and students can use a whiteboard marker on top of it. And I use these dry erase leaves for group worksheets.
1. Fill-in-the-Blank Activities
And an example of this would be an exponent activity I did with my Math 8 class. So I found this free resource on Teachers Pay Teachers, that was basically a “Fill-in-the-Blank” activity. So the first column would say nine to the fourth power times nine. The second column is where students would have to expand that work. The third column would be them putting that back into exponential form. So nine to the fifth power, and the last column being standard form or the answer to whatever nines of power is.
And this allowed me to not have to print so many copies, rather, I got to just print 10, put them into dry erase leaves and call it good. Plus, by only having one worksheet per group, I was able to have students pass it around in a clockwise fashion, and using a dry erase marker to fill it out. So they got to collaborate in a “non-permanent surface” way on finishing this exponent activity.
2. Endless Problems
Another way to use dry erase leaves is what I like to call “Roll-a-Line”, (which now that I’m saying it I probably should come up with a different name.) But it’s where students are given a graph and a template for a linear equation. And so students will roll dice, fill in the blanks and then graph the line. And the reason why I love this over worksheet is not only for the nonpermanent surface part of it, but because students are getting that practice collaboratively. So students have one paper, they’re rolling the dice, one person graphs it. And then the other two people in the group are checking the work is this line correct based on the numbers, you rolled for the equation, and then it gets passed on to the next person erased, they roll new dice for the new numbers, and then they get to graph that and it just keeps going in a circle. So students are not only getting the practice of drawing the line or graphing the line, but also watching someone else graph as well.
And I have some other “Roll-a-Line” type activities for other concepts like I have Geometric Transformations and Solving Equations. And I think that’s it for right now.
3. Clock Partners
And moving on here is the third way I use dry erase leaves in my classroom. And that is for clock partner activities. I mostly remember using clock partners. When I was in high school, we’d get like a clock at the beginning of the school year, and we’d fill it in with all of our different partners. So if me and my friend Ella wanted to be 12 o’clock partners, we put each other’s name and the 12 o’clock position on each other’s clock. This idea is very similar to how I use clock partners in my classroom. But instead of for a whole semester, I just use it for one class period. So sometimes I’ll have students just pick for people like 12, three, six, and nine, or I’ll have them fill out the entire clock. And the clock is on one side of the dry erase leave while the other is a workspace for their problem. And for the problem is I give each student in the class a different problem.
Example: Let’s say I have them meet up with their 10 o’clock partner first, they have completed their own problem. And now they switch problems. They’ll do that one check each other’s work because they’ve just done the problem. And then I’ll have them switch again to maybe their four o’clock partner. And you can have them become an expert at that first problem you’ve given. So they have their first problem the entire time. And with every clock partner, they’re switching their original problem with the other students original problem and giving it back before moving on. Or they just keep switching indefinitely with every partner they meet. So in total, they’re doing about 12 different problems throughout the entire class period.
Clock partners are a great way to get students up and moving around and working together, maybe not inside their group setting. In conclusion, dry erase leaves help you save print in the long run, as well as give your students that nonpermanent surface with whatever worksheet or activity you want to do.
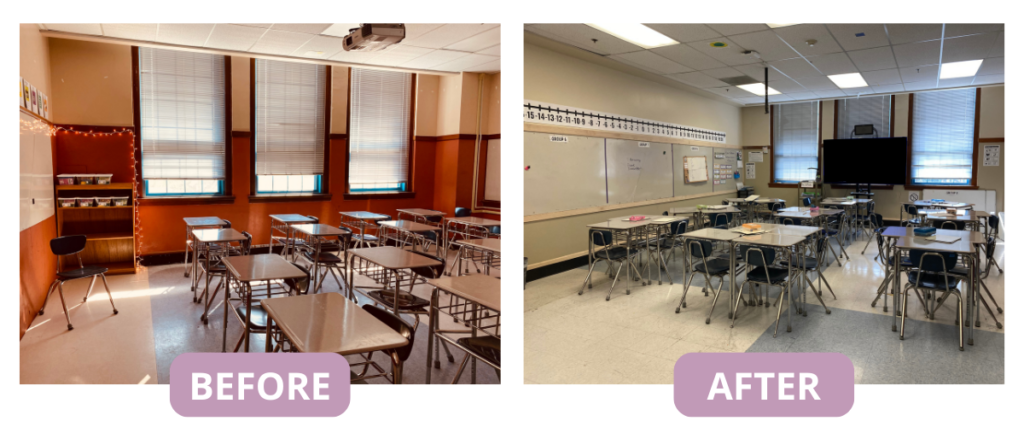
Now we’re moving into talking about vertical, non permanent surfaces, or vertical whiteboards. I’m really blessed to have vertical whiteboards on most of my walls, my classroom. But I know that’s not a reality for every teacher. So whether you have whiteboards on your walls or laminated poster papers, or you use windows, whatever it is, I’m going to share how I use vertical non permanent surfaces in my classroom.
Vertical, non permanent surfaces for my classroom are definitely the end of a lesson. So this is where I have students do the majority of their practice. But not just like, “Here’s the problem now do it.”
I tend to do real world applicable problems on whiteboards, as well as open middle or open ended tasks.
I find that those have the best success because those are longer style problems, and not something that can be done in just one minute. But they take a lot of discussion, which is a key component, as well as a lot of solving to get the final result.
And at first, I know that may seem like a lot of work. But the one thing that I’ve done that has saved me a ton of work is I’ve literally just taken the textbook problems printed it out and just cut it into strips. So now I just have a bunch of individual problems. This works really great for differentiation because I try to make the first problem that my students are doing the one that is the most important, or is the basis of what we are learning.
Differentiation Made Easy
So I was giving this example today to a coworker of I’m finishing up a volume unit. So the first problem I had my students do is the basis or the basic component of what they need to know, to be successful in the volume unit. And then the rest of the problems just build on that. So if they get the first one done, they’re golden.
But everything else will continue to build that depth of knowledge and create a real world context for whatever we’re learning. And with that differentiation piece, it allows me to see where students are at pretty easily.
I have about six to eight groups per class just because of my class sizes. And I can see you what problems students are working on. And if they’re still stuck out problem number one, where most of my teams are now maybe problem two or three, and allows me to target that group and help them through whatever thinking barriers they have.
Now I’m going to walk through a couple frequently asked questions or disclaimers of using vertical nonpermanent surfaces.
1. It Takes A Lot of Work
So one, it can tend to be a lot of work upfront setting the expectations for students. I tried to make sure that students only have one marker per group. That way they’re collaborating verbally, rather than just collaborating on a whiteboard. So whoever is doing the writing is not doing the thinking, or vice versa, the thinker is not the writer. So sometimes in the group of three, one person will be the calculator person, one will be the writer and one will be the thinker. And they’ll just rotate through those three jobs in the course of the problems.
2. What about “Answer-Stealers”?
In addition, one of the other frequently asked questions is what if students just look over and steal someone’s answer? And this has become a thing where I emphasize the process over the answer. So when I am working with a group, I’m asking, “What was your process? Walk me through it.”
And when they’re done explaining it, my number one question is, “Are you confident in your process?” Not your answer, your process?
And it’s definitely been a change of having myself say those kinds of questions, as well as my students thinking, “Oh, am I confident in this process?” But I have noticed a huge confidence shift in a lot of my students, because, yeah, they’re confident in how they did it. So why wouldn’t their answer be correct? Through this process? They’re becoming independent, and not only their need for confirmation, but also an independent thinker of my processes, right? Therefore, my answer will reflect that correct process.
And for groups I’ve just taken other groups answer you can definitely tell because of how much work is on their whiteboard. So if a problem requires multiple steps, and you just see an answer on the whiteboard, I as a teacher can go over to the group and be like, “Hey, I see you have this number. Can you walk me through how you got it?” And they’re stumbling over their words and like, “Oh, we use the calculator, blah, blah, blah”, and allows me to ask those more in depth questions to get out. What was the barrier for them to not even try the problem on their own, but rather just take another group’s answer and put it on their whiteboard.
And there you have it. Those are the three different ways I use nonpermanent surfaces:
- Mini Whiteboards
- Dry Erase Sleeves
- Vertical Whiteboards or Nonpermanent Surfaces.
I know I’ve said this and hopefully convinced you throughout this episode. But just the idea that students can wipe something away and start over fresh has really changed just the basis or the foundation of how I teach and how my students work through problems. I’ve noticed that students who may have appeared apathetic earlier on have definitely grown in confidence, or at least in willingness to try out problems.
I will be linking everything that we talked about in this episode on the show notes on my website. So if you’re like, “I need a refresher or just a recap”, definitely check it out. I will link it in the whatever platform you’re listening on. I will link the link there. So that way, you can go find it.
And as always, if you have questions, feel free to send me a message on Instagram or email me.
And with that, I’ll calc-u-later.
Transcribed by https://otter.ai
Related Episodes & Blog Posts:
More about Solving for the Undefined Podcast:
Solving for the Undefined is the go-to math teacher podcast to develop your intrigue for math and learning while helping you do the same for your students. When our host, Johanna, became a teacher, she found herself alone, creating her own activities, and trying to make math fun plus easy to implement…but it wasn’t exactly a piece of pi (or cake!).
She’s on a mission to solve those problems by helping teachers engage students academically using researched based strategies so students deeply understand and love math. And that’s what you can count on!
Some links on this page are affiliate links. This helps to support this podcast at no additional cost to you.